
1. Introduction
There are several steps involved. The first is selecting the style you need to use for your citations (defined by whoever you are presenting your document to). Next you must enter details of the books, journals etc that you are going to refer to. Once you have done that you can then automatically place a citation into your text by selecting it from a list.
2. Selecting the citation style you will use
On the References ribbon, in the Citations and Bibliography section look at the list under Style and select the relevant one.
3. Adding a new book/Journal etc (a new Source)
- Click the References ribbon
- Click Manage Sources
- Click New
- Select the Type of source (probably mostly book, Journal Article, Article in a periodical)
- Complete the fields and click OK
Repeat steps 3- 5 as necessary for each book
Note that sources are stored centrally so can be used by all documents, but you will need to copy them to the current document in Manage sources
3.1 Books/Journals with more than one author
Note that if there is more than one author you MUST click ![]() at the right of author.
at the right of author.
Now enter the first author, putting the correct parts of the name in the correct boxes,
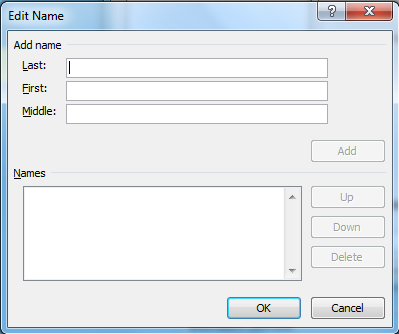
Then click Add,
Repeat for the second author and any others.
The authors must be listed in the same order as they are on the book/journal so if you put them in the wrong order use the up or down buttons to move them into the correct order.
4. Inserting a citation
- Put your cursor in the position you want the citation
- On the References ribbon click Insert Citation
- From the list click the citation you want to use
5. Altering a citation
5.1 Where you have named the author in the sentence
If you have named the author in your text then the citation should only give the date. Normally the citation gives both author and date, so we need to suppress the author. Insert the citation as usual and then alter it as below
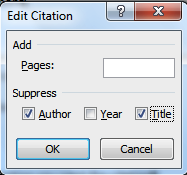
- Right click the citation and click Edit citation
- Tick the Author and Title options to suppress these
- Click OK
5.2 Where you have used a direct quote from a book
In this case you must define the page(s) the quote came from in the book.
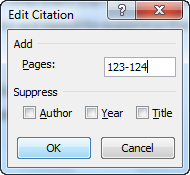
- Right click the citation and click Edit citation
- In the Pages box type the relevant page(s)
- Click OK
5.3 Where you are putting several citations in the same place.
This is a little complex as if you enter citations in the usual way each separate citation will have brackets around it, whereas the normal expectation is that you have a list of citations all contained in the same brackets. You will need to alter the field code of the first citation to do this, and the process is explained below.
5.3.1 The Tag Name
Each citation has a “Tag name”. If you edit the source you will see it at the bottom left. It is normally made up from the first three letters of the first Author’s surname, followed by the last two digits of the date. The one shown below is for Pickwick Papers, written by Dickens and published in 1837. Note that the Tag name is case sensitive. For example, when you use the one shown below you must have a capital D. You need the Tag Name in order to add a citation to an existing one.
![]()
5.3.2 Altering the field code
- Click in the first citation e.g.
- Right click the citation and click Edit Field
- You will now see a dialogue box showing something similar to that shown below. Note that it is the text in the white box that concerns us.
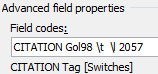
- The field is a Citation and this is followed by the Tag name for the specific citation (in this case Gol98). Two switches follow. These are explained below, along with other possible switches
\m adds another source within the same brackets (placed after the Tag name for that source) Note that this goes before the additional citation, while the other switches go After each citation to which they refer
\t excludes the title from the citation
\l uses the default language 9it could be followed by a number to use a different language)
\n excludes the name
\y excludes the year
\f “ “ places whatever is in the quote marks as a prefix, before the citation. E.g. \f “quoted in” after Gol98 would produce (quoted in Goldberg, 1998)
\s “ “ places whatever is in the quote marks as a suffix, after the citation e.g. \s “in press” after Gol98 would produce (Goldberg, 1998 in press) and \s “…” would produce (Goldberg, 1998…) which is useful if you have more than 7 citations in one place as in that case you may be expected to do the first 6, then … followed by the last citation.
\v will add the volume number for a journal which you entered in the source.,
- Having understood all that you now need to click before the final number (2057 in this case) and type the tag name of the citation you wish to use, followed by any switches you need, but remembering that you must add the \m switch before the additional citation or the citation will not show. e.g. CITATION Gol98 \l \t \\m Meh81 \t \l 2057 produces (Goldberg, 1998; Mehrabian, 1981)
- Once you have added the citations and switches that you need click OK
Note: if you get the error Invalid source specified (or the additional source is simply not shown) check the field. Common errors to look for are:
- The tag name is incorrect
- The tag name does not have the correct capitalisation
- The \m switch is missing or in the wrong place. It must exist before each tag name other than the first.
6. Deleting a citation
- Click the citation and you will see a box appear round it as shown below.
![]()
- Click the tab with three dots and press delete on your keyboard
7. Deleting a source (book, journal etc)
Note: Sources are saved in two places, the Master List which is available for all documents, and the Current List which is available for this document only. You can choose to delete from either. If it is a book you may use in another document, leave it in the Master List but delete it from the Current List. If you will never use the book delete from both.
- From the References ribbon click Manage sources
- Click the source in either the Master List (on the left) or the Current List (on the right) and click

8. Inserting a Bibliography
8.1 Checking the sources are cited
You probably need to do a little checking first. It is likely that you only want to include sources in the Bibliography which you have actually cited in the document. The automatic Bibliography will include all sources in the Current List To check this
- Click the References ribbon
- Click Manage Sources
- Look at the Current List and check that all sources have a tick by them For those with no tick you have the choice of creating a citation for them, or removing them from the Current List by clicking
- Place your cursor where you want the Bibliography to appear
- From the References ribbon click Bibliography
- Click Bibliography
8.2 Inserting the Bibliography
- Place your cursor where you want the Bibliography to appear
- From the References ribbon click Bibliography
- Click Bibliography
You should see the Bibliography appear
9. Updating a Bibliography
Remember to do this just before you print your document!
- Click inside the Bibliography.
- Look at the top and you will see

- Click on Update Citations and Bibliography
10. Deleting a Bibliography
- Click inside the Bibliography.
- Look at the top and you will see
- Click the tab with three dots
 and press delete on your keyboard
You must be logged in to post a comment.